



Extras for the Blitz⚡Bank
A collection of tips, tricks and other things about the Phoenix Wallet and LNbits
Note: This page applies to Blitz⚡Bank servers on which LNbits was installed with uv, as in the current guide. If you set up your server with Poetry, you will find the matching version of this page here: Blitz⚡Bank – Extras (old version with Poetry)
1. Help for Checking the Services
1.1 Check the Services Manually
sudo systemctl status lnbits
sudo journalctl -u lnbits -f --since "2 hour ago"
sudo systemctl status phoenixd
sudo journalctl -u phoenixd -f --since "2 hour ago"
sudo systemctl status caddy
sudo journalctl -u caddy -f --since "2 hour ago"
1.2 Create a Simple Check Script
nano ~/check_services.sh
#!/bin/bash
if systemctl is-active --quiet phoenixd;  then
   echo  "Phoenixd is running."
else
   echo  "Phoenixd is not running."
fi
if systemctl is-active --quiet lnbits;  then
   echo  "LNbits is running."
else
   echo  "LNbits is not running."
fi
if systemctl is-active --quiet caddy;  then
   echo  "Caddy is running."
else
   echo  "Caddy is not running."
fi
CTRL+X -> Y -> ENTER
chmod +x ~/check_services.sh
~/check_services.sh
-> With ~/check_services.sh you can now always run the script.
2. System Maintenance / Snapshot
2.1 Make a Snapshot
sudo systemctl stop lnbits
sudo systemctl stop phoenixd
sudo shutdown -h now
-> Make a snapshot via the website of your hosting provider and then start the VPS again.
2.2 System Update
sudo systemctl stop lnbits
sudo systemctl stop phoenixd
sudo su -
Perform the update:
sudo apt update && sudo apt upgrade -y
-> If necessary, confirm with y and Enter
Thanks to unattended-upgrades (see the main guide), the server already installs Ubuntu security updates by itself. This manual run additionally fetches all other updates, including those for Caddy. Whether a reboot is necessary is shown by cat /var/run/reboot-required. If “No such file” appears, you can skip the reboot.
reboot
-> Wait a moment and then log in again
2.3 LNbits Update
sudo systemctl stop lnbits
cd ~/lnbits
git pull --rebase
uv sync --all-extras
Note: This method applies to LNbits installed with uv as in the main guide. If you still run LNbits from the older Poetry guide, you will find the matching update commands on the old version of this page (with Poetry). There you can keep maintaining your server as usual.
Switch to uv (optional): First install uv (see the main guide, chapter 5), change the ExecStart line in /etc/systemd/system/lnbits.service to /home/blitzbank/.local/bin/uv run lnbits --port 5000 and then run sudo systemctl daemon-reload. From then on, this page applies to you.
Check the version:
git describe --tags
# Show all info
git remote -v && echo "---" && git status -sb && echo "---" && git log -1 --oneline
Restart LNbits:
sudo systemctl start lnbits
-> You can check the version at the bottom left of the LNbits start page
Check the LNbits log:
sudo journalctl -u lnbits -f --since "2 hour ago"
-> SUCCESS | ✔️ Backend PhoenixdWallet connected and with a balance of xxx msat.
-> Recommendation: Now log in with a browser incognito window and the LNbits admin account and update the extensions.
2.4 Phoenix Wallet Update
Check the Phoenixd version in use:
~/phoenixd/phoenix-cli getinfo
Compare it with the latest version: https://github.com/ACINQ/phoenixd/releases
Stop the services:
sudo systemctl stop lnbits
sudo systemctl stop phoenixd
Update the version. Adjust the version numbers in lines 2 to 4 below.
cd ~/phoenixd
wget https://github.com/ACINQ/phoenixd/releases/download/v0.9.3/phoenixd-0.9.3-linux-x64.zip
unzip -o -j phoenixd-0.9.3-linux-x64.zip
rm phoenixd-0.9.3-linux-x64.zip
./phoenixd --version
-> unzip -o overwrites the old files without asking. At the end, the new version is displayed.
Start Phoenix and LNbits:
sudo systemctl restart phoenixd
sleep 5
~/phoenixd/phoenix-cli getinfo | grep version
ls -l ~/.phoenix
sudo systemctl restart lnbits
Check the Phoenixd version:
~/phoenixd/phoenix-cli getinfo
-> See “version” below
Check in the LNbits logs whether the PhoenixdWallet was connected successfully:
sudo journalctl -u lnbits -f --since "2 hour ago"
-> SUCCESS | ✔️ Backend PhoenixdWallet connected and with a balance of xxx msat.
3. Useful Things About LNbits
3.1 Activate LNbits Extensions
In the Super User account, go to Extensions / ALL on the left, select all extensions you want to activate with MANAGE, choose the latest repository and install. Under INSTALLED you will find the activated extension.
3.2 Fund Wallets via TOPUP
When you create completely new wallets, that is always a new user account as well. So that you can find this user in your database, give the account a Username. Then, in the Super User account under Users / TOPUP, you can top up a specific wallet without a Lightning transaction. To do so, search for the username in the list, click the three bars with Show Wallets on the left and then Copy Wallet ID. After the top-up, refresh the web page. Since LNbits manages the wallet balances in a database, you can enter whatever you want here. The “real” satoshis are in the Lightning channel of the funding source.
3.3 Database Backup / Recovery
Backing up an LNbits SQLite database (the default) is quite simple. You only need to shut down the LNbits server once and then back up the folder ~/lnbits/data. Here it is compressed with the tar command and the file is then pulled to the client PC.
Make a Backup and Store It Externally
On the server (VPS):
sudo systemctl stop lnbits
cd ~/lnbits
tar cfv data_backup_yymmdd.tar ./data
sudo systemctl start lnbits
On the client (computer):
scp blitzbank@yourIPaddress:/home/blitzbank/lnbits/data_backup_yymmdd.tar ./
-> Now you should have the file data_backup_yymmdd.tar backed up on your computer and LNbits should be running again.
Restore the Backup
To restore the database, you go the reverse way:
On the client (computer):
scp data_backup_yymmdd.tar blitzbank@yourIPaddress:/home/blitzbank/lnbits/
On the server (VPS):
sudo systemctl stop lnbits
cd ~/lnbits
mv data data.backup
tar -xvf data_backup_yymmdd.tar
sudo systemctl start lnbits
-> With this, the backup should have been restored.
-> The mv command only renames the folder “data” to “data.backup”. This way you can go back if necessary.
Note: If you have set a custom port for the SSH connection, you have to use the following commands for the transfer:
scp -P 1001 blitzbank@yourIPaddress:/home/blitzbank/lnbits/data_backup_yymmdd.tar ./
scp -P 1001 data_backup_yymmdd.tar blitzbank@yourIPaddress:/home/blitzbank/lnbits/
-> It is important here to use the capital “P” and not the lowercase “p” as usual.
3.4 Cron Job Backups and External Backup
On the Target Machine
On a second VPS that you want to use as backup storage, create a user named “backup”. This user does not need admin rights, but needs an entry in the sshd_config.
sudo adduser backup
-> Set a password; entering the additional data is optional.
Do not add the user to “sudo”, it doesn’t need admin rights. Just edit the configuration file of the OpenSSH server:
sudo nano /etc/ssh/sshd_config
-> Add the line. If there is already an AllowUsers line for your admin user, leave it in place.
AllowUsers backup
Restart the ssh service once with $ sudo systemctl restart ssh and then log in with the new user if you don’t use an SSH key pair yet. Otherwise, it is better to log in as the user directly first, like this:
su backup
Create a folder “backups” and open the file “authorized_keys”:
mkdir ~/backups
mkdir ~/.ssh
nano ~/.ssh/authorized_keys
-> Paste the .pub key of the Blitz⚡Bank VPS here.
On the Backup Source
Log in to the Blitz⚡Bank VPS, create a directory named “backups” and generate a separate key pair for the backups (without a passphrase, so that the cron job works without input):
mkdir ~/backups
ssh-keygen -t ed25519
cat ~/.ssh/id_ed25519.pub
-> The output of cat is the .pub key that you paste into the file authorized_keys of the user “backup” on the target machine (see above).
Test the archive command:
tar cfv ~/backups/data.tar ~/lnbits/data
-> Now there should be a “data.tar” file in the directory “backups”.
Test the transfer command:
scp -P 1001 -i ~/.ssh/id_ed25519 ~/backups/data.tar backup@backupIPaddress:~/backups/data_$(date +\%Y\%m\%d_\%H\%M).tar
Note: The transfer here refers to a backup VPS that uses an SSH key (id_ed25519) and a custom SSH port (1001). See: “Advanced Hardening of the VPS Access” further below.
-> Check that the file arrived at the target.
Set up a cron job to perform the scheduled archiving and transfer to the target machine:
crontab -e
Fill it with:
# Backup every hour at minute 0
0 */1 * * * tar cfv ~/backups/data_$(date +\%H\%M).tar ~/lnbits/data
# Daily backup at 5 minutes after 0 o'clock
5 0 * * * tar cfv ~/backups/data_$(date +\%Y\%m\%d).tar ~/lnbits/data
# Daily backup at 10 minutes after 0 o'clock for transfer
10 0 * * * tar cfv ~/backups/data.tar ~/lnbits/data
# Daily transfer at 15 minutes after 0 o'clock
15 0 * * * scp -P 1001 -i ~/.ssh/id_ed25519 ~/backups/data.tar backup@backupIPaddress:~/backups/data_$(date +\%Y\%m\%d_\%H\%M).tar
# Delete all entries older than 7 days at 20 minutes after 0 o'clock
20 0 * * * find ~/backups/* -type f -mtime +7 -delete
-> Don’t forget to also delete the backups on the receiving side regularly with a cron job.
Note on consistency: A tar of the running SQLite database can produce an unusable copy if LNbits happens to be writing at that very moment. sqlite3 .backup is safer. Install it with sudo apt install sqlite3 -y and replace the two daily tar lines (00:05 and 00:10) with this one line. The transfer at 00:15 then has to transfer the file database.sqlite3 instead of data.tar:
5 0 * * * sqlite3 ~/lnbits/data/database.sqlite3 ".backup '/home/blitzbank/backups/database.sqlite3'"
You can check the available disk space with the command df -T -h. With the command ls -lha you can display files in a human-readable form.
4. Useful Things About Phoenix
4.1 Phoenix Help
~/phoenixd/phoenix-cli -h
   getinfo                Show basic info about your node
   getbalance             Returns your current balance
   estimateliquidityfees  Estimates the liquidity fees for a given amount, at current feerates.
   listchannels           List all channels
   getoutgoingpayment     Get outgoing payment
   listoutgoingpayments   List outgoing payments
   getincomingpayment     Get incoming payment
   listincomingpayments   List incoming payments
   createinvoice          Create a Lightning invoice
   getoffer               Return a Lightning offer (static invoice)
   getlnaddress           Return a BIP-353 Lightning address (there must be a channel)
   payinvoice             Pay a Lightning invoice
   payoffer               Pay a Lightning offer
   paylnaddress           Pay a Lightning address (BIP353 or LNURL)
   decodeinvoice          Decode a Lightning invoice
   decodeoffer            Decode a Lightning offer
   lnurlpay               Pay a LNURL
   lnurlwithdraw          Withdraw funds from a LNURL service
4.2 Empty the Phoenix Wallet
If you want to empty the Phoenix Wallet completely, you first have to close the Lightning channel. You can do that on the command line with the following command:
~/phoenixd/phoenix-cli closechannel --channelId=4bc2cc34.. --address=bc1qw5h27.. --feerateSatByte=4
As you can see, you still need three things: the channelId, the address to which your remaining outbound liquidity is to be transferred, and the feerateSatByte.
You can find the channelId here:
~/phoenixd/phoenix-cli getinfo
It is best to get the Bitcoin address to which the remaining funds are to be sent from your BitBox02. But you can also use BlueWallet, Phoenix or another Bitcoin wallet. The address type doesn’t matter. The new Taproot format p2tr works too.
The best way to determine the feerateSatByte is mempool.space. Just look at what typical values have been lately. If you are not sure, you can also take a look at whatthefee.io. I would never go below 3 sat/vB, though.
As confirmation you only get one line with the closingTxId (e.g. 126aea45be230..). You can then check the status of the tx again using the ID on mempool.space.
4.3 Useful Phoenix Commands
~/phoenixd/phoenix-cli getinfo
~/phoenixd/phoenix-cli createinvoice \
    --description "my first invoice" \
    --amountSat 200000
~/phoenixd/phoenix-cli listchannels | grep "txId"
~/phoenixd/phoenix-cli getlnaddress
~/phoenixd/phoenix-cli createinvoice --amountSat=1234 --desc="comment"
~/phoenixd/phoenix-cli payinvoice --invoice lnbc3320..
~/phoenixd/phoenix-cli paylnaddress --amountSat=2100 --address="axelhamburch@ereignishorizont.xyz" --message="Thanks for the Blitz⚡Bank"
~/phoenixd/phoenix-cli decodeinvoice --invoice=lnbc2210n..
5. Useful Things About Caddy
5.1 Check the Caddy Version and Update
Caddy is the web server that provides your domains with HTTPS and forwards the requests to LNbits. It should also be updated from time to time. First check the installed version:
caddy version
-> The output looks e.g. like this: v2.10.2 h1:g/gTYjGMD0dec+.... Only the first part (v2.10.2) matters. Compare it with the latest version on https://github.com/caddyserver/caddy/releases. With the Blitz⚡Bank, Caddy is installed from the official package source, so a normal update is usually enough:
sudo apt update
sudo apt install --only-upgrade caddy
caddy version
-> If afterwards an older version than on GitHub is still shown, use apt policy caddy to check whether the package source dl.cloudsmith.io/public/caddy/stable shows up there at all. If it is missing, get current setup commands from caddyserver.com/docs/install.
Note on expired signatures: If apt update reports an error like EXPKEYSIG ... Caddy Web Server, only the GPG key of the package source has expired. With the following command you fetch it again (the existing key file is overwritten without asking because of --yes):
curl -1sLf 'https://dl.cloudsmith.io/public/caddy/stable/gpg.key' | sudo gpg --yes --dearmor -o /usr/share/keyrings/caddy-stable-archive-keyring.gpg
sudo apt update
With sudo apt upgrade from chapter 2.2, Caddy is updated as well. The automatic security updates (unattended-upgrades) from the main guide do not cover the Caddy package source, so you have to update yourself from time to time. After the update, it is worth a quick look at whether the service is still running:
systemctl is-active caddy
-> active must appear and your websites must still be reachable.
5.2 Enable the Access Log
By default, Caddy writes no access log. So there is no record of who accessed which page and when. You don’t notice this in everyday use. After a break-in, however, the most important trace is missing: the IP address and the exact course of the attack.
With this guide, Caddy writes a shared access log for all your domains to /var/log/caddy/access.log. In doing so,
- API keys are hidden from the URL (LNbits passes e.g.
?api-key=…or?usr=…in the address), - Caddy already leaves out cookies and password headers on its own,
- the log is deleted after 30 days and limited to 10 files of 50 MB each.
Why this matters: In October 2026, a Lightning node was drained via a security vulnerability in the Bolt Card Hub (GHSA-vmxv-qh54-c79j). What had happened could be reconstructed exactly from the logs of phoenixd and the hub. Only one question remained open: Which IP address did the attacker come from? The hub does not log IP addresses and Caddy had no access log. For a police report, exactly this information would have been valuable.
Prerequisites: Caddy is installed as a system service (Ubuntu/Debian package), the configuration is in /etc/caddy/Caddyfile and the folder /var/log/caddy exists and belongs to the user caddy (which is the case with the package).
Step 1: Create a Backup
sudo cp /etc/caddy/Caddyfile /etc/caddy/Caddyfile.bak-$(date +%F)
Step 2: Define a Snippet
A snippet is a configuration building block that you define once at the top of the Caddyfile and then include in every site. This way the log setting is in one place only. Here, the snippet is placed in a new file /tmp/Caddyfile.new in front of the existing Caddyfile. The running configuration remains untouched.
sudo tee /tmp/accesslog.caddy > /dev/null << 'EOF'
(accesslog) {
    log {
        output file /var/log/caddy/access.log {
            roll_size 50MiB
            roll_keep 10
            roll_keep_for 720h
        }
        format filter {
            fields {
                request>uri query {
                    replace api-key REDACTED
                    replace usr REDACTED
                    replace wal REDACTED
                }
            }
        }
    }
}

EOF
sudo sh -c 'cat /tmp/accesslog.caddy /etc/caddy/Caddyfile > /tmp/Caddyfile.new'
roll_size 50MiB: a new file is started at 50 MBroll_keep 10: at most 10 old files are keptroll_keep_for 720h: old files are deleted after 30 daysreplace api-key REDACTED: the value of?api-key=appears in the log asREDACTED
-> You can add further secret URL parameters following the same pattern.
Step 3: Include the Snippet in Every Site
Below every line of the form domain.com { there must be import accesslog. This command does that automatically (comment lines remain untouched):
sudo sed -E -i '/^[A-Za-z0-9*][A-Za-z0-9.*:,-]*( [A-Za-z0-9.*:,-]+)* \{$/a\    import accesslog' /tmp/Caddyfile.new
diff /etc/caddy/Caddyfile /tmp/Caddyfile.new
-> Check the output of diff: The snippet must be at the top and below every domain there must be a line > import accesslog. If a domain is missing (e.g. because it is indented), add the line there by hand:
sudo nano /tmp/Caddyfile.new
A finished site block then looks like this:
lnbits.example.org {
    import accesslog
    reverse_proxy 127.0.0.1:5000
}
Step 4: Validate and Activate
First validate, then apply. As long as validate reports an error, the running configuration remains unchanged. The check runs as the user caddy, so that a log file created in the process doesn’t belong to root (otherwise Caddy could not write to it later).
sudo -u caddy caddy validate --config /tmp/Caddyfile.new --adapter caddyfile
sudo cp /tmp/Caddyfile.new /etc/caddy/Caddyfile
sudo systemctl reload caddy
systemctl is-active caddy
-> At the end, active must appear.
Step 5: Test
Open one of your sites in the browser and look at the log:
sudo tail -n 3 /var/log/caddy/access.log
-> One line per request appears in JSON format.
Reading the Log
With jq the entries become readable. Installation:
sudo apt install jq
Follow along live (time, IP, domain, method, path, status):
sudo tail -f /var/log/caddy/access.log | jq -c '{ts: (.ts|todate), ip: .request.remote_ip, host: .request.host, m: .request.method, uri: .request.uri, status}'
All requests to admin areas:
sudo jq -c 'select(.request.uri|startswith("/admin")) | {ts: (.ts|todate), ip: .request.remote_ip, host: .request.host, uri: .request.uri, status}' /var/log/caddy/access.log
Which IPs accessed most often?
sudo jq -r '.request.remote_ip' /var/log/caddy/access.log | sort | uniq -c | sort -rn | head
-> The timestamps (ts) are in UTC. For your local time, add your UTC offset (e.g. one hour in winter or two hours in summer for Germany).
Privacy
The log contains the IP addresses of your visitors. These are personal data. Retention is therefore limited to 30 days and the log is only readable with sudo. If you operate services for others (e.g. LNbits accounts), you should mention in your privacy policy that accesses are logged for 30 days for security reasons.
Undo
sudo cp /etc/caddy/Caddyfile.bak-YYYY-MM-DD /etc/caddy/Caddyfile
sudo systemctl reload caddy
-> Replace YYYY-MM-DD with the date of the backup from step 1 (ls /etc/caddy/ shows it).
6. Advanced Hardening of the VPS Access
Note: Key login, disabled password login and blocked root login are already set up in the main guide (chapter 3). Here you will find the background and, additionally, how to change the SSH port. The following methods for further strengthening security are relevant and good. But all too often mistakes happen and you lock yourself out. First make a snapshot of your VPS so that you can always go back. Then go through everything very slowly step by step and always test the new access before you disable anything! For example the password access, the root user or a port.
Important on Ubuntu 24.04: Settings in files under /etc/ssh/sshd_config.d/ take precedence over the main file /etc/ssh/sshd_config. Some hosters re-enable password login there (e.g. in 50-cloud-init.conf). Whether your settings actually apply, you check after every restart of the SSH service with this command:
sudo sshd -T | grep -Ei '^(passwordauthentication|permitrootlogin|port|allowusers) '
-> passwordauthentication no and permitrootlogin no are expected. If something else is shown, create the settings as in the main guide in the file /etc/ssh/sshd_config.d/00-hardening.conf.
6.1 Use an SSH Key
Using SSH key pairs sounds complicated at first and is a bit confusing, but once you have understood it, it is quite simple. Let me have ChatGPT explain it:
An SSH key pair is a kind of security tool used for secure login to a computer or server. Think of it as a lock and a matching key that work together to open a door – only here it is about digital security.

Here are the two parts of the SSH key pair:

1. Private key: This is like your personal, secret key. You should never share it with anyone. It always stays safely on your own computer.

2. Public key: This is like the lock you mount on the server. It can be seen by other people, because it doesn't matter if it is publicly known. The public key is copied to the server you want to log in to.

How does it work?

1. When you want to log in to a server, the server checks your public key.
2. Your computer (with the private key) "talks" to the server, and the server checks whether the private key matches the public key.
3. If it does, you are let in, without any password. The private key never leaves your computer.
You can easily generate a key pair yourself on your computer. To do so, open your terminal as if you were logging in, and generate a key pair with the following command:
ssh-keygen
First you will be asked where you want to store the key pair. If you simply press ENTER, the path and file name suggested in brackets are used. Then the prompt “Enter passphrase” appears. Here you can additionally encrypt the key. This passphrase is the password for decrypting the private key. When you log in to the remote server, the private key has to be decrypted with the passphrase. You then no longer need the password of the user to log in. The passphrase is not strictly required, but offers additional security. Make sure not to lose the key file and the passphrase. Below you will find a picture of generating an SSH key pair on a Windows 11 computer.
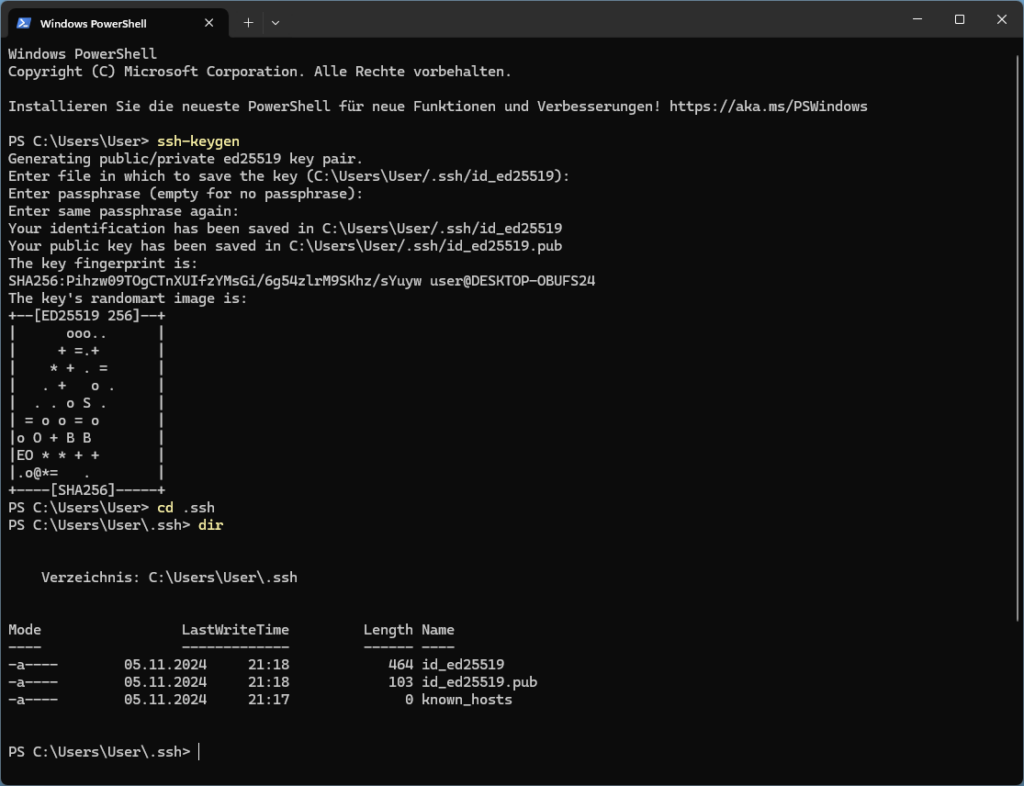
Image: Generating an SSH key pair
Ed25519 is a modern asymmetric encryption algorithm. The private key id_ed25519 and the public key id_ed25519.pub were stored on the computer in the path C:\Users\<Username>\.ssh. These are two files that you can open and read with a simple text reader such as Notepad. Alternatively, you can use the command cat id_ed25519.pub, which displays the key in the terminal. The file known_hosts is a file that your computer creates to store the keys of other computers. It only serves to verify the authenticity of the other computer.
A brief interlude for your information: If you reinstall your server at some point, it has generated a new key pair and you get the following warning message.
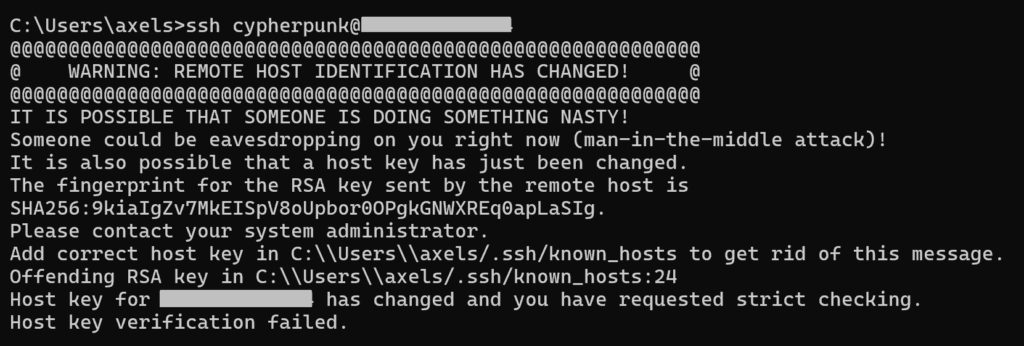
Image: Warning message “man-in-the-middle attack”
In this case you can be reassured, since you now know why the message appears: the key changed with the reinstallation. To fix it, you only have to delete the key from the known_hosts file, then at the next login the computer stores the new key from the server in the file again. The message also tells you where the file is located. In this case in the folder path: C:\Users\<Username>\.ssh.
Moving on.. Now you can read the content of the public key id_ed25519.pub, select it and copy it to the clipboard. Then paste the key on the command line of your Blitz⚡Bank server into the file authorized_keys:
mkdir ~/.ssh
nano ~/.ssh/authorized_keys
-> CTRL+X -> Y -> ENTER.
Now you can test the key by logging out once with the command exit and logging in again. Either you are logged in as if by magic, or, if you have set a password protection for the key, you are asked for the password to decrypt it and then logged in.
Important: Store your key with the blitzbank user. You will disable root login later anyway (6.3). If you want to keep using root access, the key must also be stored there in /root/.ssh/authorized_keys.
Note: If you just press ENTER at the login prompt with your encrypted key, the password prompt appears as the second option. Try it out!
6.2 Disable Password Login
Once you have secure access with your SSH key, you can disable login by password. Before you do that, it is best to set up a second computer with which you can get access in an emergency. Alternatively, you can also back up the private key id_ed25519 yourself. The public key is not critical, the private key however is.
To disable login by password:
sudo nano /etc/ssh/sshd_config
Set PasswordAuthentication to no (on Ubuntu 24.04 better in the file /etc/ssh/sshd_config.d/00-hardening.conf, see the note above):
PasswordAuthentication no
-> CTRL+X -> Y -> ENTER
Restart the SSH server once:
sudo systemctl restart ssh
-> Now log in again and dismiss the SSH key prompt with ENTER; you should then no longer see a password prompt. This now applies to all users.
6.3 Disable Login as the root User
Since the root user is a well-known target of attacks, you can disable login for it.
sudo nano /etc/ssh/sshd_config
PermitRootLogin no
# AllowUsers root
-> One of the two is enough.
-> CTRL+X -> Y -> ENTER
Now restart the SSH server once:
sudo systemctl restart ssh
-> Try to log in as the root user -> This should no longer work; only the blitzbank user should work with the SSH key.
6.4 Customize the Port Access (SSH Port 22 -> 1001)
You can choose the port number (1001) for the firewall freely:
sudo ufw allow 1001 comment 'OpenSSH neu'
sudo nano /etc/ssh/sshd_config
Add another line with the additional port:
Port 1001
-> CTRL+X -> Y -> ENTER
sudo systemctl restart ssh
Log out once with exit and log in again, with a slightly modified command:
ssh -p 1001 blitzbank@yourIPaddress
-> Note the -p 1001. The port release for 1001 now applies to all users.
Note Ubuntu 24.04: There, the SSH service is started via ssh.socket. If login on port 1001 doesn’t work although the configuration is correct (don’t log out, check in the still open connection), reload the configuration and check the listening ports:
sudo systemctl daemon-reload
sudo systemctl restart ssh.socket
sudo ss -tln | grep -E ':22|:1001'
Now remove the release for the standard port 22 in the firewall (ufw) again and look at the status. An additional deny rule would have no effect, because ufw evaluates the rules in order and the older allow rule for port 22 applies first:
sudo ufw delete allow 22
sudo ufw status
Now disable the port access in the SSH config:
sudo nano /etc/ssh/sshd_config
Comment out the line Port 22 with #:
# Port 22
CTRL+X -> Y -> ENTER
Restart the system service once:
sudo systemctl restart ssh
Log out with exit and log in again to check the access – in the hope that you haven’t locked yourself out. 😉
Important for fail2ban: The protection against brute-force attacks from the main guide only monitors port 22 by default. Point it to the new port:
sudo nano /etc/fail2ban/jail.local
[sshd]
enabled = true
port = 1001
-> CTRL+X -> Y -> ENTER, then sudo systemctl restart fail2ban and check with sudo fail2ban-client status sshd.
With this you have added a big portion of extra security to the server. 💪 You have left only a small hidden little door open. Keep the access and the knowledge about it safe.
7. Miscellaneous
7.1 Lightning Address and Nostr NIP-05 ID
Through LNbits and the “Pay Links” extension, we have the possibility to create a Lightning address. In the format username@yourdomain.com. You can store the Lightning address e.g. in your Nostr account and then you can receive Lightning⚡Zaps via Nostr. The sender sees this as a zap symbol and as an increase of the total amount on your note. Additionally, when creating a new Pay Link instance you can optionally activate “Enable nostr zaps”. This reports the zap back to your client as well. So you actively get a message and can follow it in the zap history.
Nostr profiles also have the option of storing a NIP-05 ID. With it you can prove that the domain belongs to you, or that the username is uniquely yours on this domain. The NIP-05 ID looks exactly like your Lightning address username@yourdomain.com. When there is a request for the user username, the server yourdomain.com only has to cross-check whether the user to be verified has the same npub (public Nostr key) as the one stored on the server. If they match, the profile gets a verified ✅ checkmark in the Nostr client.
With the Blitz⚡Bank you already have everything you need for this. You only have to extend the Caddy entry for the domain yourdomain.com a little. But first you have to convert the npub to hex format. You can do this very easily with a key converter. Please make sure to use only the npub, not the nsec!
Then open the Caddyfile with the command sudo nano /etc/caddy/Caddyfile and add the NIP-05 part:
yourdomain.com {
  handle /api/v1/payments/sse* {
    reverse_proxy 127.0.0.1:5000 {
      header_up X-Forwarded-Host yourdomain.com
      transport http {
         keepalive off
         compression off
      }
    }
  }
  reverse_proxy 127.0.0.1:5000 {
    header_up X-Forwarded-Host yourdomain.com
  }
  # Nostr NIP-05 direct response
   handle /.well-known/nostr.json {
   header Content-Type application/json
   header Access-Control-Allow-Origin *
   respond `{"names":{"username":"2126bb82....9c7780"}}` 200
  }
}
Replace the username and the hex string with your own values and save the file.
Then reload the Caddy web server with sudo systemctl reload caddy and your NIP-05 ID should be ready.
If you want to have several IDs, it looks like this:
{
  "names": {
    "username": "2126bb82....9c7780",
    "alice": "a1b2c3d4....abcdef",
    "bob": "e5f6g7h8....123456",
    "satoshi": "9i0j1k2l....fedcba"
  }
}
Made with love 🧡 Since 866520 / 973870