



CyberPanel
Build your own web hosting server.
Trial by Fire – A Cyberattack on My CyberPanel Server
After I received an abuse report from my hosting provider on 28.10.2024, a few exciting days began. A security researcher found an RCE (Remote Code Execution) vulnerability in the software of my self-hosted web hosting panel CyberPanel (GitHub). Unfortunately, in his blog post of 27.10.2024 he also published an exploit right away. It did not take long until thousands of web hosting servers and even more websites were infected: crypto-mining malware, ransomware that encrypted files as .psaux, .encryp, .locked etc., or that took over the server or rendered it unusable.
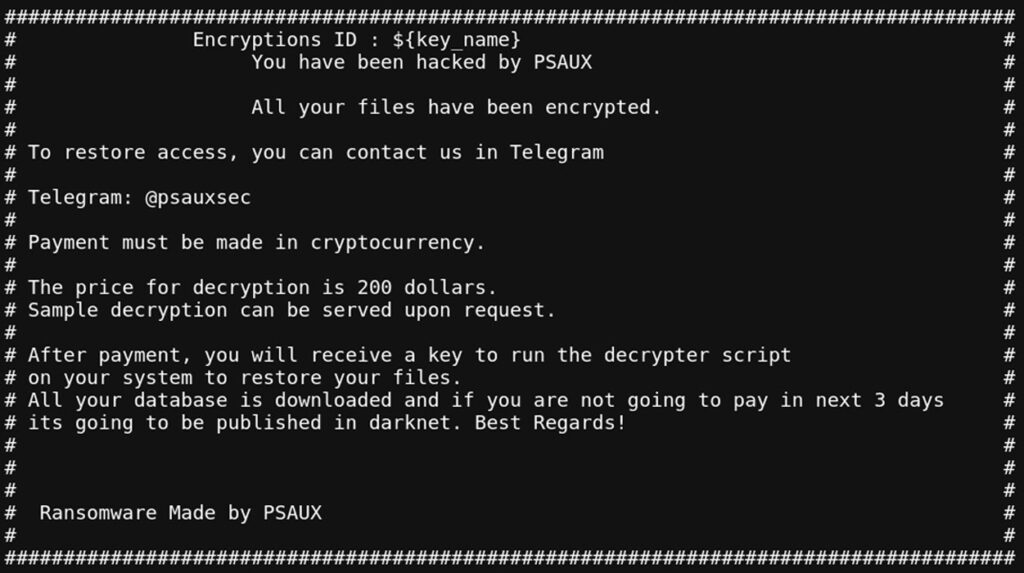
Image: Notice displayed on a server hit by ransomware.
By the way, the ransom demands were also paid in Bitcoin.
The distress was great, and the precautions for my website turned out to be rather meager. Who expects a small private website to become the target of a large-scale attack? Well, anyway, I was lucky in my misfortune. I had several backups and knew how to restore them, since I had migrated from one hosting provider to another a few weeks earlier. Even so, it took a while and cost a lot of nerves. I learned a lot in the process and realized that every Virtual Private Server must be secured as much as possible. In this article I have loosely put together a few points. Maybe it will be useful to someone.
1. Setting up and hardening the VPS
This tutorial uses an Ubuntu 22.04 LTS server. You can find a guide to setting up an Ubuntu VPS here, for example: 7.1 – General – Setting up a Virtual Private Server (VPS). The minimum requirement is 2 GB RAM.
Root login:
ssh root@yourIPaddress
1.1 Basics
Update / Upgrade
apt update && apt upgrade -y
-> You may have to press Enter.
Note: ufw (uncomplicated firewall) is not installed here, because a firewall (firewalld) comes with CyberPanel later.
fail2ban
apt install fail2ban -y
systemctl enable fail2ban
systemctl start fail2ban
systemctl status fail2ban
-> Confirm twice with Enter.
Note: A swapfile is not installed here, because it comes automatically with CyberPanel later.
1.2 Create a dedicated user
For more security, we create a new user that we will use to log in from now on. It also gets “root” privileges, but has to identify itself with its password again and again. This offers more security and better traceability, and protects against human error.
adduser cypherpunk
-> Set a password; entering the remaining data is optional.
usermod -aG sudo cypherpunk
-> Assign root privileges to the user.
Important: Edit the configuration file of the OpenSSH server.
sudo nano /etc/ssh/sshd_config
Extend it with:
AllowUsers cypherpunk
-> CTRL+X -> Y -> Enter
Note: If you still want to reach the VPS with the “root” user, you must also add the line AllowUsers root to the configuration file, if it is not already there. Otherwise you will see the error message “Permission denied, please try again.” when you try to log in as the “root” user. After five failed attempts, access is blocked completely for 10 minutes, because Fail2ban blocks all connections.
Now shut down the VPS, take a snapshot if necessary, and restart everything.
poweroff
-> To create a backup of your Virtual Private Server as a snapshot, you will surely find a corresponding function on the website of your VPS hosting provider. It creates a complete image of your disk or VPS. You can restore it at any time to bring the server back to an earlier state. Then you restart the server via the website and from now on always log in with the new user.
ssh cypherpunk@yourIPaddress
2. Installing and setting up CyberPanel
2.1 Installing CyberPanel
Note: To follow this tutorial, the hostname of the server should not be that of your domain. So not yourdomain.xyz. Simply name the host “CyberPanel”, for example, as done here.
sudo su - -c "sh <(curl https://cyberpanel.net/install.sh || wget -O - https://cyberpanel.net/install.sh)"
-> During the installation: 1+Enter, 1+Enter, 6x Enter
Attention: At the end of the installation, the CyberPanel access data is displayed:
   ...
   CyberPanel Successfully Installed
   ...
   Visit: https://yourIPaddress:8090
   Panel username: admin
   Panel password: bAJWFpasswordWEjV6
   ...
-> After saving the data, confirm the message Would you like to restart your server now? [y/N]: with ENTER.
-> sudo systemctl poweroff and create a snapshot.
2.2 Setting up CyberPanel
After you have logged in to CyberPanel, you will see the “Set-up Wizard” at the top. It helps you set up the first website. Ideally, the A and AAAA records already point to the IP address of the CyberPanel server. Then log in to CyberPanel and follow these steps.
1. If available, use the “Set-up Wizard” displayed at the top. It makes setting up the first website easier.
2. If it is no longer displayed, you can also set up the website manually under MAIN > Websites > Create Website, if you have not done so yet.
3. Create an FTP account on the new server under MAIN > FTP > Create FTP Account. The username “yourusername” is automatically changed to “admin_yourusername”. The IP address is that of your VPS, the port is 21, and as an FTP client you can use FileZilla.
4. If you are setting up CyberPanel anew in order to migrate an existing installation, you can set the PHP version in advance after restarting your CyberPanel under MAIN > Websites > List Websites > Manage > Change PHP. You get the version from the “Site Health report”, see point 3.1 / guide point 5.
3. Data backup and migration
Before we can restore or migrate data, we first have to have backed it up.
3.1 Data backup
Recommended backup methods
To make sure your website can be restored quickly in case of a problem, I recommend at least three backup methods:
3.1.1 Snapshots of the entire VPS
Create snapshots of the entire VPS regularly. These can be done manually, especially before updates or major changes, and additionally on a schedule. The exact procedure varies depending on the hosting provider and is usually well documented. It usually works very well and reliably. But it is of no use to you if you want to migrate to another VPS, or if your VPS or snapshot is deleted because your hosting provider fell victim to a hacker attack and has no backups, or because the disk needed to restore the data is in the forensics department of the criminal police.
Regular snapshots of the entire VPS are an excellent way to back up the state of your server. They can be created manually, e.g. before updates or major changes, as well as on a schedule. The exact procedure depends on the hosting provider and is usually well documented. Snapshots mostly work reliably and are a quick way to restore the state of the VPS.
Important note:
However, snapshots are of little use to you if you want to migrate to another VPS or if the VPS or the snapshot is deleted – for example because your hosting provider fell victim to a hacker attack and has no backups, or because the disk needed to restore the data is in the forensics department of the police as part of a forensic investigation. That is how it happened to me, at least.
That is why I recommend additionally falling back on external backup methods to create a safer foundation for your data.
3.1.2 Automatic backups to external cloud drives
Use plugin software such as UpdraftPlus to create scheduled backups of your WordPress website and upload them to external cloud storage such as Google Drive, Dropbox or OneDrive. You will find detailed setup instructions from the respective plugin providers. Automatic backups secure all WordPress-relevant data such as the database, themes and plugins. This method is very reliable and offers a convenient way to protect the most important data.
Important: However, automatic backup methods do not cover all data. Manual entries in the directory that were made via FTP uploads or the CyberPanel menu are usually not part of these backups. These files remain unsecured, which can cause problems if they are lost or needed during a migration.
Recommendation: To also back up these manually uploaded files, the next method is recommended: the manual backup. This method ensures that all content – including custom files that are not backed up automatically – is also stored externally.
3.1.3 Manually backing up data, database and Site Health report
The manual backup is particularly useful if you want to create backups independently of automated tools. It is ideal for migrating the website to another hosting provider or to a new VPS when needed. Here is a short guide:
1. Create a folder
On your local computer, create a folder named in the format YYMMDD (e.g. 250111 for 11 January 2025).
2. Back up the website files
-> In the CyberPanel web server, navigate to MAIN > Websites > List Websites > yourdomain.xyz > File Manager.
-> Compress the public_html folder into a .tar.gz file.
-> Download the file public_html.tar.gz and save it in the folder you created earlier.
3. Export the MySQL database
-> Open phpMyAdmin in CyberPanel under MAIN > Database > PHPMYAdmin.
-> In the left column, select your website’s database (e.g. your_databasename).
-> Export the database with the settings Quick and SQL.
-> Also save the file your_databasename.sql in the backup folder.
4. Save the Site Health report
-> Open WordPress and navigate to Tools > Site Health > Info.
-> Copy the “Site Health report” to the clipboard.
-> Create a text file in the backup folder and paste the report there. Save the file to keep important information such as the PHP version, the plugins used and other details.
Important note: Clean up the database before backing it up
Before you export the database, you should clean it up to avoid possible complications during the later import. Especially with older websites that have gone through many updates and upgrades, data junk, countless revisions and broken links can accumulate. These can cause conflicts during the import. Steps for cleaning up:
1. Use cleanup plugins:
-> Use a plugin such as WP-Sweep, WP Optimize or Advanced Database Cleaner to rid the database of unnecessary entries.
-> This not only saves storage space, but also reduces the likelihood of conflicts.
2. Tool in phpMyAdmin:
-> phpMyAdmin offers an additional cleanup tool. To use it, select the database, scroll down, choose “Check all” and then select “Table maintenance > Repair table” from the dropdown menu. Then repeat the same with “Table maintenance > Optimize table”. On its own, however, this is often not enough, so it is advisable to combine it with one of the plugins mentioned above.
Tip: Occasionally back up data in WordPress format externally. If you want to save the up-to-date formatting and content of individual pages, you can do so directly in the WordPress Block Editor:
1. Open the desired page in the Block Editor.
2. At the top right, switch to the Code Editor (Editor > Code Editor).
3. Select the entire source code of the page and copy it to the clipboard.
4. Save the code as a plain text file on your computer.
This method is particularly useful if you want to document smaller but important changes or make sure that no work is lost.
3.2 Data restoration / data migration
3.2.1 Transferring data
Restoring a snapshot at the VPS hosting provider is relatively simple and well documented by most providers. Restoring with UpdraftPlus is also well described. Manually migrating the data backup and the database, however, requires a few additional steps that you need to know. Here is a guide to restoring data from the backup folder (backup method in chapter 3.1.3) on a newly set up server:
1. Upload and extract files
Use FileZilla to upload the file public_html.tar.gz to the directory /home/yourdomain.xyz on the new server. Log in to CyberPanel and navigate to the directory /home/yourdomain.xyz. Click the “Extract” button to extract the file into the directory public_html.
2. Upload the database
Also upload the database file your_databasename.sql with FileZilla to the directory /home/yourdomain.xyz/public_html.
3.2.2 Migrating data
1. Create an empty database with Database > Create Database:
Enter -> databasename, username and password
databasename: your_databasename
username: your_username
password: …
2. On the command line (CLI), log in to the server as “root”
3. Enter the following command to import the database:mysql -u your_username -p your_databasename < /home/yourdomain.xyz/public_html/your_databasename.sql
Note: The password is that of the new, empty database that was created earlier (not that of the old database).
3.2.3 Setting the database connection
1. In CyberPanel, open the file public_html/wp-config.php in the site’s File Manager.
2. Set the new values under DatabaseName, UserName and Password and check that the host is localhost.
Check the PHP version used in the “Site Health report” of the data backup and, if necessary, set it under MAIN > Websites > List Websites > Manage > Change PHP.
3.2.4 Final steps
1. IP redirection for a new server – Do not forget to adjust the IP redirection as well if the new server has a different IP address. Log in to your domain provider and, in the DNS section, change the A and AAAA records to the new IP address of the VPS with CyberPanel. Afterwards you can verify the changes, e.g. with tools such as nslookup.io.
Note on the HTTPS site after an IP change: If your HTTPS site is not reachable immediately after the change or shows an error, be patient. Certificate management can take some time, especially when your server moves to a new IP address; it can even take a few hours.
2. Restart the VPS – After all adjustments, restart the VPS once using the following command: sudo systemctl reboot
3. Function test with a test file – Normally you should now see your restored site. If not, you can test the server by creating a simple test file in the directory ./public_html/, e.g. neu.txt. This file should then be accessible in the browser with the URL yourdomain.xyz/neu.txt.
4. Check TLS/SSL certificates – If you still get TLS/SSL error messages, create a new certificate in CyberPanel:
-> Navigate to MAIN > SSL > Manage SSL > Issue SSL and have the certificate issued.
5. Check UpdraftPlus backups
Check whether other backup services such as UpdraftPlus have a more recent backup. To do so, open the UpdraftPlus plugin and go to Existing backups > Rescan remote storage. If a new version is found in your personal cloud storage, you can upload and restore it directly.
6. Data backup through UpdraftPlus and manual measures – Since even UpdraftPlus only creates a backup every few days, a few hours or days can still be missing in case of data loss. In such cases, all you can do is hope that you additionally made manual backups. As described in chapter 3.1 “Data backup”, I regularly copy the source code of a page in the WordPress Block Editor and save it in a plain text file. I do this above all when I have created a new page into which I have put a lot of work, or before I make major changes. Better safe than sorry – you never know what can happen.
7. Offline copies as a last resort – Something else that has helped me once before was an offline copy of a page. When I noticed that my hosting provider had messed up and my website had been lost because of a problem with CyberPanel, I fortunately still had the most recently edited page open in my browser. So I was able to quickly save it offline. In such cases, objects such as images and videos as well as specific formatting have to be restored manually, but at least I had the painstakingly written texts at hand and could paste them back in with copy and paste. Conclusion: it makes sense to save your pages offline every now and then so that you can fall back on them in an emergency.
Note on UpdraftPlus: UpdraftPlus copies the current data into directories that it names with “-old”. These are not deleted automatically after the restoration, and the WordPress interface gives you no way to delete the directories. A simple way is to do it in CyberPanel via MAIN > Websites > List Websites > yourdomain.xyz > File Manager. You will find the “-old” directories at: /home/yourdomain.xyz/public_html/wp-content/updraft/. You should delete them.
Note on UpdraftPlus:
When restoring your data, UpdraftPlus saves copies of the current content in directories ending in “-old”. However, these directories are not deleted automatically after the restoration. Unfortunately, the WordPress interface offers no way to remove these directories.
A simple way to delete the “-old” directories is to use CyberPanel. Proceed as follows:
-> Navigate to MAIN > Websites > List Websites > yourdomain.xyz > File Manager.
-> There you will find the directories at: /home/yourdomain.xyz/public_html/wp-content/updraft/
You can safely delete these directories to free up storage space.
3.3 Total failure of a hosting provider (Update 878787)
I would never have thought that one of the hosting providers I use for my VPSs would itself become the successful target of a hacker attack. But that is what happened: on 04.01.2025 this website was suddenly gone. The entire VPS on which CyberPanel was running was no longer reachable. After a while it turned out that the attacker had attacked the Proxmox server and destroyed the entire cluster system with all virtual disks and all VPSs, including the snapshot backups. At first it was said that they were trying to restore the disks. However, by then the incident had already been reported to the police, the Federal Office for Information Security (BSI), the Federal Network Agency (BNetzA) and the state data protection authority, and they of course forbade any attempt at data recovery, since that would destroy evidence. The criminal police then seized the physical disks and handed them to a forensics department. They will remain there for the next two years, and the likelihood of being able to recover any data afterwards is said to be very small.
Quite apart from the fact that they apparently handled their Proxmox system rather negligently, since they allowed remote access to the heart of the system at all and, it seems, the firewall was also inactive at the time. But what was really the crowning blow: they had zero external backups or offline backups. Zero! All data gone, completely. For the three VPSs I ran there, I got nothing back. I have been working on this website, for example, for years. A lot of work and accumulated knowledge is in it. Had I blindly trusted the provider, everything would have been gone, forever.
At the time I had migrated my website from an expensive provider to a cheaper one, which has now also failed. Even though that turned out to be a mistake in hindsight, I learned a lot in the process, and that has now saved me. I knew how to move with CyberPanel and my website and how to run an external data backup for that. This knowledge and the experience from the trial by fire, which I will go into afterwards, have now saved me. I had a basic manual backup of the website directory from the beginning of November 2024 and an automatically created UpdraftPlus cloud backup from 29.12.2024. And luckily I had quickly managed to make an offline backup of the page I had worked on in the last few days in my browser, so that I did not have to reinvent everything, but could copy it back and only had to upload the few images again.
You see, if you rely on others, the probability that you will regret it is greater than zero. Do not rely on local backups, distribute the backups across other independent systems. Then you can always sleep soundly. After this incident I revised this backup and recovery guide once more. I hope it can spare someone greater grief someday.
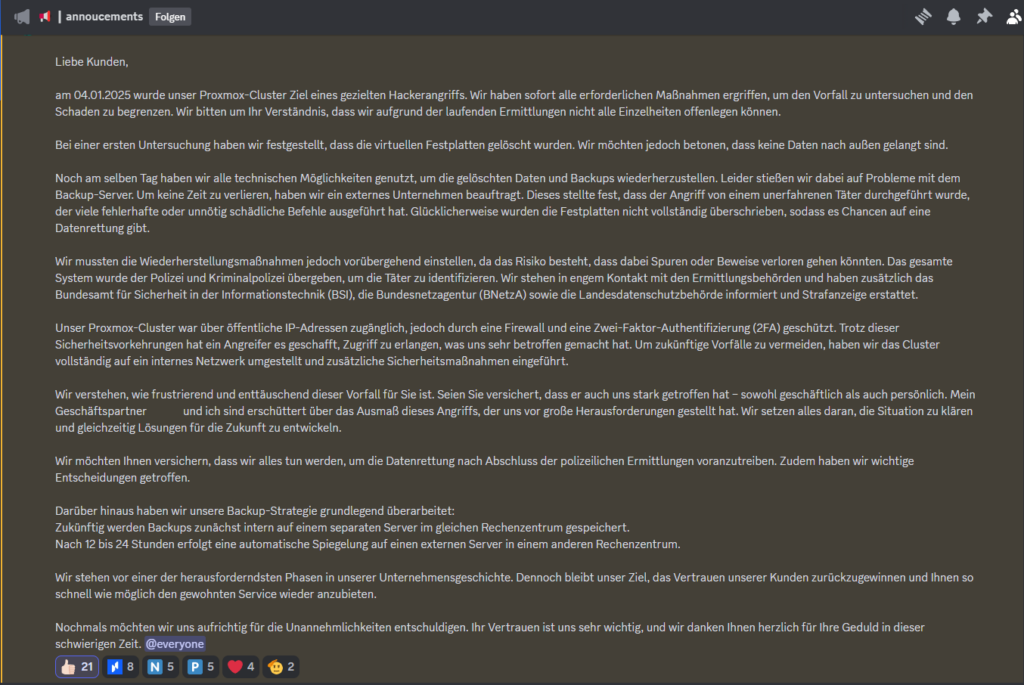
Image: Announcement – Late realization
4. Options for advanced hardening
The following methods for further strengthening security are relevant and good. But all too often mistakes happen and you lock yourself out. First, take a snapshot of your VPS so that you can always go back. Then go through everything very slowly, step by step, and always test the new access before you disable anything. Also remember that CyberPanel itself brings a firewall, which you can configure via CyberPanel. For example, you have to open or close the individual port for SSH access there.
4.1 Using an SSH key
Using SSH key pairs sounds complicated at first and is a bit confusing, but once you have understood it, it is quite straightforward. I’ll let ChatGPT explain it:
An SSH key pair is a kind of security tool used to log in securely to a computer or server. Think of it as a lock and a matching key that work together to open a door – except that here it is about digital security.

Here are the two parts of the SSH key pair:

1. Private key: This is like your personal, secret key. You should never share it with anyone. It always stays safe on your own computer.

2. Public key: This is like the lock you mount on the server. It can be seen by other people, because it does not matter if it is publicly known. The public key is copied to the server you want to log in to.

How does it work?

1. When you want to log in to a server, the server checks your public key.
2. Your computer (with the private key) "talks" to the server, and the server makes sure that the private key matches the public key.
3. If they match, you are logged in.

The special thing is that this method is secure, because only the person who has the matching private key can log in. Since the private key stays secret and is never sent, the likelihood of a hacking attack is much lower than when using a password.
You can easily generate a key pair yourself on your computer. To do so, open your terminal as if you were logging in, and then generate a key pair with the following command:
ssh-keygen
First you will be asked where you want to store the key pair. If you simply press ENTER, the path and file name suggested in parentheses are used. Then the prompt “Enter passphrase” appears. Here you can additionally encrypt the key. This passphrase is the password for decrypting the private key. When you log in to the remote server, the private key has to be decrypted with the passphrase. You then no longer need the user’s password to log in. The passphrase is not strictly required, but offers additional security. Make sure not to lose the key file and the passphrase. Below you will find an image of generating an SSH key pair on a Windows 11 computer.
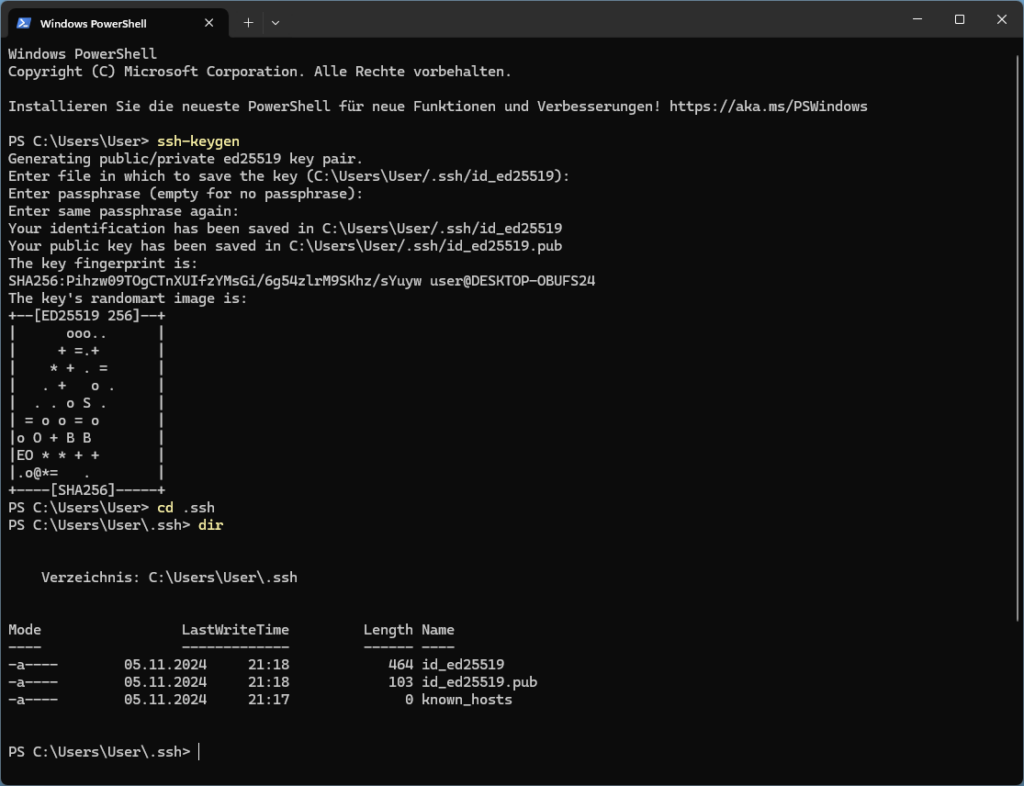
Image: Generating an SSH key pair
Ed25519 is a modern asymmetric encryption algorithm. The private key id_ed25519 and the public key id_ed25519.pub were stored on the computer in the path C:\Users\User\.ssh. These are two files that you can open and read with a simple text reader such as Notepad. Alternatively, you can use the command cat id_ed25519.pub, which displays the key in the terminal. The file known_hosts is a file your computer creates to store the public keys of other computers. It serves only to verify the authenticity of the other computer.
A short aside for your information: If you ever reinstall your server, it will have generated a new key pair and you will get the following warning message.
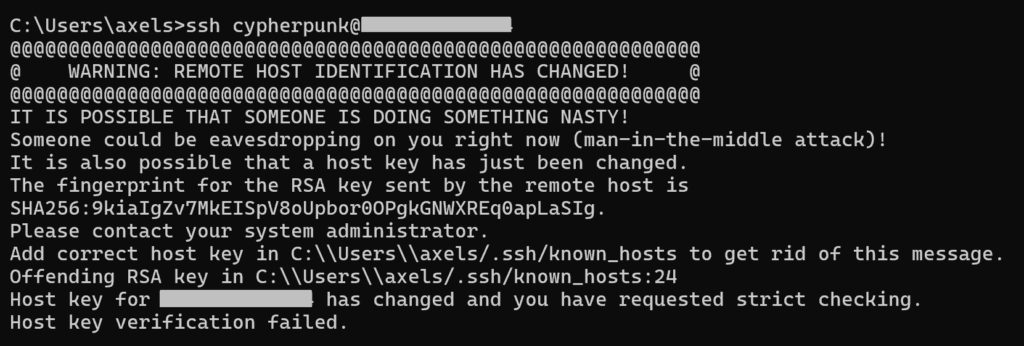
Image: Warning message “man-in-the-middle attack”
In this case you can rest easy, since you now know why the message appears: the key changed when the server was set up again. To fix it, you only have to delete the key from the known_hosts file, and the computer will store the server’s new key in the file again at the next login. The message also tells you where the file is located. In this case in the folder path: C:\Users\axels\.ssh.
Moving on.. Now you can read the contents of the public key id_ed25519.pub, select it and copy it to the clipboard. Then paste the key into the file authorized_keys on the command line of your CyberPanel server:
mkdir ~/.ssh
nano ~/.ssh/authorized_keys
-> CTRL+X -> Y -> ENTER.
Now you can test the key by logging out once with the command exit and then logging in again. Either you are logged in as if by magic, or, if you set a password protection for the key, you will be asked for the password to decrypt it and then logged in.
Important: You must store your keys for the root user and for the cypherpunk user. To do so, log in once with each of them.
Note: If you simply press ENTER at the login prompt for your encrypted key, the password prompt appears as the second option. Try it out!
Note: You can now also see your added SSH keys in CyberPanel. Under SERVER > Security > Secure SSH > SSH Keys.
4.2 Disable password login
Once you have secure access with your SSH key, you can disable login by password. Before you do that, it is best to set up a second computer that you can use to get access in an emergency. Alternatively, you can also back up the private key id_rsa (on Windows) yourself. The public key is not critical, but the private key is.
To disable login by password:
sudo nano /etc/ssh/sshd_config
Set PasswordAuthentication to no:
PasswordAuthentication no
-> CTRL+X -> Y -> ENTER
Restart the SSH server once:
sudo systemctl restart ssh
-> Now log in again and dismiss the SSH key prompt with ENTER; you should then no longer see a password prompt. This now applies to both users.
4.3 Disable foreign SSH keys
In the .ssh directory of the root user there is a private and a public key named cyberpanel. I could not identify any use for them and therefore disabled them.
nano ~/.ssh/cyberpanel
nano ~/.ssh/cyberpanel.pub
-> Put a “NO_” at the beginning of each key. This invalidates the keys.
4.4 Disable login as root user
Since the root user is a well-known target of attacks, you can disable login for it. You have two options. One is disabling it via the CyberPanel firewall under SERVER > Security > Secure SSH > Basic > Permit Root Login. The second is directly via the console:
sudo nano /etc/ssh/sshd_config
PermitRootLogin no
# AllowUsers root
-> CTRL+X -> Y -> ENTER
Note: With # AllowUsers root it is also ruled out that you can flip the “Root user” switch from CyberPanel. If you want to control this via CyberPanel, you must remove the comment character # in front of AllowUsers root. Then only the yes/no of PermitRootLogin applies.
Now restart the SSH server once:
sudo systemctl restart ssh
-> Try to log in with the root user -> This should no longer work now; only the cypherpunk user should work with the SSH key.
4.5 Customizing the port (SSH port 22 -> 1001)
You can choose the new SSH port for access freely: for example port number 1001. Since CyberPanel handles the firewall and port management for you, you also have to enable the port there. To do so, go to SERVER > Security > Firewall in CyberPanel and define the rule:
Rule Name = SSHnew / tcp / 0.0.0.0/0 / Port = 1001
-> You should now see the new port rule in the list.
Now you still have to enter the port in the sshd_config:
sudo nano /etc/ssh/sshd_config
Add another line with the additional port:
Port 1001
-> CTRL+X -> Y -> ENTER
sudo systemctl restart ssh
Log out once with exit and log in again, with a slightly modified command:
ssh -p 1001 cypherpunk@yourIPaddress
-> Pay attention to the -p 1001. The port rule for 1001 now applies to all users.
Now disable the default port 22 in the CyberPanel firewall. To do so, go to SERVER > Security > Firewall and delete the line with port 22.
Now disable the port access in the SSH config:
sudo nano /etc/ssh/sshd_config
Comment out the line Port 22 with #:
# Port 22
CTRL+X -> Y -> ENTER
Restart the service:
sudo systemctl restart ssh
Restart once, exit and log in again to check the access, in the hope that you have not locked yourself out. 😉
With that you have added a big portion more security to the server. 💪 You have left only one small hidden door open. Keep the access and the knowledge about it safe.
4.6 Close unused ports
Depending on how you use your CyberPanel, you need various ports open. But if you do not use the email function, for example, you can close all ports related to it. Other ports are optional. For my part, I only use the basic functions, and that includes the ports: 8090, 80, 443, 21 and 22 or 1001. All other ports are closed or deleted from the firewall rules. To do so, go to SERVER > Security > Firewall and delete all ports you do not need.
4.7 Disable CyberPanel
What is not there cannot be abused. The websites themselves also run without an active CyberPanel.
Here are a few commands for stopping, disabling autostart, starting, enabling autostart and checking the status. You can also simply disable CyberPanel without any problem if you do not need it. Here are a few useful commands. “Stop” only applies to the session; after a restart CyberPanel is active again. With “disable”, CyberPanel is disabled permanently. With “enable” you can activate it again. “Status” shows the current status.
sudo systemctl stop lscpd
sudo systemctl disable lscpd
sudo systemctl start lscpd
sudo systemctl restart lscpd
sudo systemctl enable lscpd
sudo systemctl status lscpd
4.8 New username and password for OpenLiteSpeed
The OpenLiteSpeed panel can be accessed by calling the server directly on port 7080: https://yourIPaddress:7080. To change the user and the password, log in as the “root” user and run the script ./admpass.sh.
cd /usr/local/lsws/admin/misc
./admpass.sh
5. Appendix
5.1 Sources and further information
Website: https://www.cyberpanel.net
Forum: https://forums.cyberpanel.net or https://community.cyberpanel.net/
Wiki: https://docs.cyberpanel.net
Documentation: https://cyberpanel.net/docs/
GitHub: https://github.com/usmannasir/cyberpanel
5.2 Show the CyberPanel version and perform an upgrade
Check the CyberPanel version and commit:
cd /usr/local/CyberCP/
sudo git log -1
In the GitHub repository you can check for new versions and commits: https://github.com/usmannasir/cyberpanel
Perform the CyberPanel upgrade:
sudo su - -c "sh <(curl https://raw.githubusercontent.com/usmannasir/cyberpanel/stable/preUpgrade.sh || wget -O - https://raw.githubusercontent.com/usmannasir/cyberpanel/stable/preUpgrade.sh)"
-> Now restart the entire server once so that the firewall is activated again as well: sudo systemctl reboot
Note: If you get the following error message during the upgrade:
TypeError: canonicalize_version() got an unexpected keyword argument 'strip_trailing_zero'
Then update the pip packages:
sudo pip install packaging==22
You can find the complete error message at pastebin.com.
5.3 Ubuntu system update
sudo su -
apt update && apt upgrade -y
reboot
5.4 fail2ban log files
# Show simple logfiles
sudo cat /var/log/fail2ban.log
# Show sorted logfiles
sudo awk '($(NF-1) == "Ban"){print $NF}' /var/log/fail2ban.log \
  | sort | uniq -c | sort -n
You can find more information here.
5.5 Checking the CyberPanel firewall and SSH settings
You can view the status of the CyberPanel firewall under SERVER > Security > Firewall. You can check it directly and call up the logs on the command line:
sudo systemctl status firewalld
sudo journalctl -u firewalld
Check the port settings of the firewall:
sudo firewall-cmd --zone=public --list-all
sudo firewall-cmd --list-all
You can view or change the SSH port setting, the root login and the stored SSH keys under SERVER > Security > Secure SSH.
5.6 Email server
Here are a few loose tips for setting up an email server with maximum compatibility, so that our emails are also accepted by the receiving server. The setup is quick, but the fine-tuning so that emails are not flagged as spam or even blocked is not entirely trivial. A few terms first:
rDNS (Reverse DNS)
PTR (short for ‘Pointer’)
SPF (Sender Policy Framework)
DKIM (DomainKeys Identified Mail)
DMARC (Domain-based Message Authentication, Reporting, and Conformance)
DMARC is based on the results of SPF and/or DKIM checks.
Rough order of setup:
1. Set up the domain in CyberPanel and make sure to also create an email domain and select DKIM.
2. Set up reverse DNS (rDNS PTR) (system settings of the VPS at the cloud provider)
2.1 At the cloud server provider, in the VPS section under Settings > IP address, set the PTR record for the domain. A rDNS lookup will then show the domain of the email server.
2.2 Check with a web tool: https://mxtoolbox.com/ReverseLookup.aspx
2.3 Check with the CLI: dig -x 147.93.120.157 +short -> displays the domain. Alternatively with: nslookup -debug 147.93.120.157
3. Check that the DKIM record exists: cyberpanel > MAIN > Email > DKIM Manager. And online directly with https://mxtoolbox.com/SuperTool.aspx. At the button you can make a selection, e.g. DKIM Lookup.
4. Add extended TXT records for the email CyberPanel server on the DNS server of the domain registrar
4.1 View TXT records: Cyberpanel > MAIN > DNS > Add/Delete Records
4.2 Add them to the DNS records of the domain. The type is TXT, and take the name and value from the CyberPanel TXT record. Watch out for “default._domainkey”. Remove all ” in the long string. Also the one just before the end.
4.3 Change the p=none of the records _dmarc and _dmarc.mail to p=reject or p=quarantine.
4.4 Add a record of type “MX”: yourdomain.com mail.yourdomain.com. All email requests are then forwarded to the subdomain “mail”.
4.5 Add a record of type CNAME: www.mail mail.yourdomain.com. (This is how it is explained in the video. I do not see a reason for it.)
5. Create an email address: CyberPanel > MAIN > Email > Create Email or https://yourdomain.com:8090/snappymail/index.php
6. Open Snappymail: CyberPanel > MAIN > Email > Access Webmail. Check sending and receiving email.
7. Perform an MX lookup: https://mxtoolbox.com/SuperTool.aspx
Note: If several domains are hosted on a CyberPanel server but only one IP address is available, reverse DNS (PTR) can point to only a single domain. Therefore, the MX record of the additional domains must always point to the mail server of the domain registered for reverse DNS. Example: MX / Name: @ / Value: mail.ereignishorizont.xyz. CNAME record for www.mail (optional): CNAME / Name: www.mail / Value: mail.ereignishorizont.xyz.
Next, test the email with https://www.mail-tester.com. Below are a few possible results and solutions or explanations. SpamAssassin result:
-1.725 PDS_OTHER_BAD_TLD Untrustworthy TLDs URI: ereignishorizont.xyz (xyz)
-> see:
https://www.spamresource.com/2022/02/heres-odd-spamassassin-problem.html
https://github.com/apache/spamassassin/blob/trunk/rulesrc/sandbox/pds/20_ntld.cf
-> The top-level domain .xyz is simply on the PDS_OTHER_BAD_TLD list (possible for spam)
-1.284 RCVD_IN_RP_RNBL Relay in RNBL, https://senderscore.org/blocklistlookup/
Blacklist check:
https://mxtoolbox.com/SuperTool.aspx -> Enter the domain and run the “Blacklist Check”
Finally, test the email server: http://mxtoolbox.com/diagnostic.aspx
Possible error message:
DMARC Policy Not Enabled DMARC Quarantine/Reject policy not enabled
-> How to Fix “DMARC Quarantine/Reject Policy Not Enabled”
DMARC is the abbreviation for Domain-based Message Authentication, Reporting, and Conformance.
If we see a warning like “DMARC Quarantine/Reject Policy Not Enabled,” it means our domain has a DMARC policy of p=none. This only allows monitoring and does not provide protection against spoofing.
So, we can fix this by modifying the p parameter in our DMARC record from p=none to either p=reject (reject completely) or p=quarantine (move to the spam folder) to enforce DMARC protection.
See: https://bobcares.com/blog/dmarc-policy-not-enabled-cyberpanel/#:~:text=If%20we%20see%20a%20warning,not%20provide%20protection%20against%20spoofing.
Possible error:
SMTP Valid Hostname Reverse – DNS is not a valid Hostname
-> Your reverse DNS record (PTR) is not a valid hostname. According to best practices for sending email, a PTR record should be a valid hostname. If the PTR record is not a valid hostname, you are likely to run into email delivery problems with anti-spam services.
-> No solution found yet
Alternative email server test: https://platform.cyberpersons.com/MailTester/MailTester or https://mailtower.app/de/domain-check
Set up WP Mail SMTP: https://wordpress.org/plugins/wp-mail-smtp/
More links:
https://www.youtube.com/watch?v=k_WriIl_Bo4
https://www.youtube.com/watch?v=cdp5M_xwn5A
https://community.cyberpanel.net/t/achieve-10-10-email-score-with-cyberpanel/30653
https://bobcares.com/blog/dmarc-policy-not-enabled-cyberpanel/
https://www.proofpoint.com/de/threat-reference/spf#:~:text=Ein%20SPF%2DEintrag%20enth%C3%A4lt%20mehr,SPF%2DEintrag%20beide%20Versionen%20enthalten.
5.7 Redirecting a domain page
Edit the ./public_html/index.html page and fill it with:
<script type="text/javascript">
<!--
window.location = "http://ereignishorizont.xyz/";
//–>
</script>
5.8 Installing WordPress
With CyberPanel you can create platforms for websites. The website’s domain name links to a folder on the CyberPanel server. The path is: /home/mydomain.com/ with the folder public_html appended. WordPress still has to be installed in that folder. Then a new database is set up and its data is saved in a wp-config.php file. Afterwards, restart CyberPanel and call up the website. A WordPress start page then appears to complete the installation. Here is the step-by-step guide.
1. Download the latest version of WordPress from the official site.
2. If not yet available, create an account in CyberPanel under MAIN > FTP > Create FTP Account.
3. With an FTP tool such as FileZilla, place the zip file under /home/mydomain.com/.
4. In CyberPanel under MAIN > Websites > List Websites > mydomain.com / File Manager, select the zip file and choose Extract.
5. Go into the new folder wordpress, select all files, choose Move , extend Move to with /home/mydomain.com/public_html and choose Move.
6. Switch to the folder public_html and rename the file wp-config-sample.php to wp-config.php.
7. Create a new database in CyberPanel under MAIN > Database > Create Database.
8. Go back to public_html and adjust ‘DB_NAME’, ‘DB_USER’ and ‘DB_PASSWORD’ in the file wp-config.php and save the file.
9. Check that ‘DB_HOST’ = ‘localhost’, ‘DB_CHARSET’ = ‘utf8’ and ‘DB_COLLATE’ is empty.
10. Either reboot the CyberPanel server or restart it with the command sudo systemctl restart lscpd.
11. Call up your domain mydomain.com and follow the WordPress instructions.
5.9 Setting up a website again with an UpdraftPlus backup
With just the UpdraftPlus backup you can fully restore the website on a new CyberPanel server. However, you have to do a few things beforehand.
Install CyberPanel
Create the DNS record for the website
Create the website in CyberPanel
Create a database for it
Create an FTP account for it
Call up the domain -> CyberPanel page
Upload the current WordPress file with an FTP uploader
Extract the contents and move them into the folder public_html
Call up the domain -> WordPress setup page
Follow the instructions for setting up a database
Follow the WordPress welcome page
Call up the site -> WordPress blog page
Log in to the WordPress dashboard
Install and activate the UpdraftPlus plugin
Upload and restore the UpdraftPlus backup
After the restoration, log in with the old WordPress login from the backup
Note: Only the folders and files directly necessary for the website are stored in the backup. Manually added folders and files are not restored.
5.10 Enabling CORS for the .well-known folder
CORS (Cross-Origin Resource Sharing). Needed to make files on the web server that are not directly visible available to other applications.
To check: test the folders https://ereignishorizont.xyz/.well-known and https://ereignishorizont.xyz/.well-known/lnurlp for CORS with the test tool https://cors-test.codehappy.dev.
If the check reports a CORS error, log in to the web server via CLI and edit the vhost.conf.
sudo su
cd /usr/local/lsws/conf/vhosts/ereignishorizont.xyz/
nano vhost.conf
Append the following content at the end:
context /.well-known/ {
  location                $DOC_ROOT/.well-known/
  allowBrowse             1
  extraHeaders            Access-Control-Allow-Origin *
  rewrite  {
    RewriteFile           .htaccess
  }
  addDefaultCharset       off
  phpIniOverride  {
  }
}
Restart the LiteSpeed web server once: systemctl restart lsws
Check the new configuration with the following command: curl -I https://ereignishorizont.xyz/.well-known
The result should contain Access-Control-Allow-Origin: *. ✅
To be safe, query the CORS tester once more.
If there are problems, you may need to clear the cache once with curl -X PURGE https://ereignishorizont.xyz/.well-known.
Optional: For certain applications, the context above can be extended with the following permissions.
extraHeaders Access-Control-Allow-Methods "GET, POST, OPTIONS"
extraHeaders Access-Control-Allow-Headers "Content-Type, Authorization"
But this should actually not be necessary.
For the Nostr and Lightning⚡ address:
Check the reachability of nostr.json for NIP-05: https://ereignishorizont.xyz/.well-known/nostr.json
Check the forwarding for the Lightning⚡ address: https://ereignishorizont.xyz/.well-known/lnurlp/axelhamburch
Test Lightning⚡ address:
curl -s https://ereignishorizont.xyz/.well-known/lnurlp/axelhamburch | jq
curl -s https://ereignishorizont.xyz/.well-known/lnurlp/axelhamburch\?amount=1000
curl -s https://ereignishorizont.xyz/.well-known/lnurlp/axelhamburch\?amount=1000 | jq
5.11 Security Advisory: Enumeration Exposure
The white hat “Zeroday Guardian” recently alerted me by email to a security problem on my website.
By default, WordPress exposes the username or usernames via the REST API at https://yourdomain.com/wp-json/wp/v2/users/.
Impact:
– Increases the attack surface for brute-force attacks.
– Endangers the confidentiality of user data.
– Facilitates password-spraying techniques.
Suggested solution:
1. Use uniform, non-descriptive response messages.
2. Introduce adaptive throttling.
3. Monitor suspicious login patterns and issue alerts.
Solution for 1: Restrict access to this endpoint -> code snippet in functions.php
– Log in with an FTP program (e.g. FileZilla) or directly in the CyberPanel File Manager.
– Navigate to /home/YOURUSER/public_html/wp-content/themes/YOUR-THEME/.
– Add the code:
// Block REST API user endpoint
add_filter( 'rest_endpoints', function( $endpoints ) {
    if ( isset( $endpoints['/wp/v2/users'] ) ) {
        unset( $endpoints['/wp/v2/users'] );
    }
    if ( isset( $endpoints['/wp/v2/users/(?P<id>[\d]+)'] ) ) {
        unset( $endpoints['/wp/v2/users/(?P<id>[\d]+)'] );
    }
    return $endpoints;
});
➡️ Result: The endpoint /wp-json/wp/v2/users/ returns a 404 error.
Solution for 2: Install the login security plugin “Limit Login Attempts Reloaded”
Link: https://wordpress.org/plugins/limit-login-attempts-reloaded/
➡️ Result: Additionally protects against brute-force attacks
Solution for 3: Check the logs regularly
-> On the WordPress dashboard, the failed logins are shown in the “Limit Login Attempts Reloaded” widget.
-> In the CyberPanel dashboard, check the entries under Server > Logs.
–> Direct links: Access Logs, Error Logs, Email Logs, FTP Logs and CyberPanel Main Log File
➡️ Result: Early detection of suspicious logs.
5.12 Vulnerability Report [X-frame By-Pass] or [Click-Jacking]
Once again, a white-hat security researcher (Whitehat Security) pointed out a vulnerability on my website. The so-called X-Frame bypass uses a web component to get around the protection mechanisms of the X-Frame-Options header, which normally prevents a web page from being embedded in an <iframe> on foreign domains. Clickjacking is a form of attack in which an attacker places an invisible or transparent layer over a seemingly harmless web page in order to trick users into manipulated clicks.
You can check for yourself whether your site is affected by this vulnerability. To do so, create a file with the extension .html and the following content (adjust the web address accordingly). Open the file in the browser by double-clicking it.
<html>
<head>
</head>
<body>
<h1>Click-Jacking In Your Site</h1>
<iframe src=" https://ereignishorizont.xyz "height="800" width="1300">
</iframe>
</body>
</html>
→ If your website is displayed in the embedded window, there is a potential risk of clickjacking.
Remedy:
The vulnerability can be fixed by extending the HTTP header with a Content-Security-Policy (CSP):
Content-Security-Policy: frame-ancestors 'self';
To enter the CSP, I used the option in the WebAdmin Console of my OpenLiteSpeed server from Cyberpanel. To do so, log in to the server > select Virtual Hosts > select the domain. Then under Context > select + (Add). When asked which type you want: specify Static and select Play (Next). Fill in the field URI with /, Location with /home/yourdomain.com/public_html, Accessible with Yes and fill Header Operations with Content-Security-Policy frame-ancestors 'self. Finally, floppy disk (Save) and restart the server once with the cycle button (Graceful Restart).
For this I used the WebAdmin Console of my OpenLiteSpeed server via CyberPanel. Procedure:
– Log in to the server
– Open Virtual Hosts → select the desired domain
– Under Context click “+ Add”
– Select “Static” as the type and confirm with “Next”
– Fill in the fields:
— URI: /
— Location: /home/yourdomain.com/public_html
— Accessible: Yes
— Header Operations: Content-Security-Policy frame-ancestors 'self'
– Save (floppy disk icon)
– Restart the server via “Graceful Restart”
Verify the entry:
You can test whether the entry has taken effect on a Linux server by entering the following command:
curl -I https://ereignishorizont.xyz
-> The server’s response should contain the line content-security-policy: frame-ancestors ‘self’.
And if you run the test with the HTML page again, the page should no longer be displayed and should return a similar message: “yourdomain.com refused to connect.”
Risk assessment:
Since my site has no sensitive, logged-in actions, the actual impact of the scenarios described is low. The protection should still be set – “defense in depth”.
Extension options:
The AI made me a suggestion for a complete security configuration. For this, the “Header Operations” field has to be extended.
Content-Security-Policy frame-ancestors 'self'
X-Content-Type-Options nosniff
X-Frame-Options SAMEORIGIN
Referrer-Policy strict-origin-when-cross-origin
Permissions-Policy geolocation=(), microphone=(), camera=()
Strict-Transport-Security max-age=63072000; includeSubDomains; preload
Explanation of the individual headers:
| Header | Purpose |
|---|---|
Content-Security-Policy | Prevents embedding |
X-Content-Type-Options | Prevents MIME sniffing by the browser |
X-Frame-Options | Prevents embedding in foreign frames (in addition to the CSP) |
Referrer-Policy | Controls which referrer data is sent along when leaving your site |
Permissions-Policy | Disables access to camera, microphone, geolocation (can be adjusted) |
Strict-Transport-Security | Enforces HTTPS for all subdomains and allows preloading in browsers |
This new security configuration is meant to protect against common attack vectors such as clickjacking, MIME sniffing, referrer leaks, XSS and more – while remaining compatible with modern browsers. For a final opinion, however, I still lack long-term experience.
5.13 Miscellaneous
Message: The uploaded file exceeds the upload_max_filesize directive in php.ini.
-> https://yourdomain.com:8090/managephp/editPHPConfigs
Made with love 🧡 Since 858407 / 975204